This article shows how to get started with NDNts, Named Data Networking (NDN) libraries for the modern web. In particular, it demonstrates how to write a consumer-only web application that connects to the NDN testbed, transmits a few Interests, and gets responses. This application uses JavaScript programming language and webpack module bundler.
Code samples in this article were last updated on 2024-03-06 to reflect latest changes.
Prepare the System
To use NDNts, you must have Node.js. As of this writing, NDNts works best with Node.js 20.x, and you should install that version. The easiest way to install Node.js is through Node Version Manager (nvm) or Node Version Manager (nvm) for Windows.
On Ubuntu 22.04, you can install nvm and Node.js with the following commands:
$ wget -qO- https://raw.githubusercontent.com/nvm-sh/nvm/v0.39.7/install.sh | bash

$ nvm install 20 --latest-npm
Now using node v20.11.1 (npm v10.2.4)
For this guide, it is not necessary to install ndn-cxx or NFD on your computer.
Now create a directory for our new project, and then open a code editor such as Visual Studio Code at this directory. If you are on Windows, configure VS Code to use Git Bash terminal for better experience.
Install NDNts
NDNts is a group of Node.js packages. Although they have been published to NPM registry, NPM releases happen infrequently. Thus, it's best to install nightly builds to obtain the latest features.
To install NDNts nightly builds, create a file package.json in the project directory, and then paste the following content:
{
  "private": true,
  "type": "module",
  "packageManager": "pnpm@8.15.4",
  "dependencies": {
    "@ndn/autoconfig": "https://ndnts-nightly.ndn.today/autoconfig.tgz",
    "@ndn/endpoint": "https://ndnts-nightly.ndn.today/endpoint.tgz",
    "@ndn/packet": "https://ndnts-nightly.ndn.today/packet.tgz",
    "@ndn/util": "https://ndnts-nightly.ndn.today/util.tgz"
  }
}
Then, type corepack pnpm install at the terminal.
A minute later, all packages and their dependencies are installed.
Install webpack Module Bundler
ndn-js, the predecessor of NDNts, used to publish a pre-compiled ndn.min.js file.
Developer can include this file on their webpage with a <script> tag, and then access the exported global objects.
While it is convenient for a quick prototype, this approach has a performance implication: the ndn.min.js file weighs 134KB (after gzip compression) and contains every functionality of ndn-js; browsers have to download the entire file even if the web application only needs a small subset of the functionality.
134KB does not look like a big number, but in web development terms, it is 79% of the 170KB JavaScript budget on a webpage.
This increases Time-to-Interactive and negatively affects user experience.
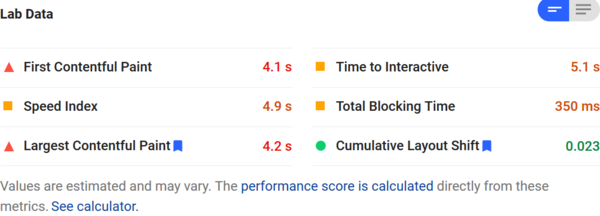
As an example, an NDN video player implemented with ndn.min.js and Shaka Player downloads 287KB of JavaScript (gzipped), and received a "65" score from PageSpeed Insights:

NDNts does not publish NDNts.min.js.
Instead, we encourage the use of a static module bundler, to generate a JavaScript bundle that includes only the functionality needed by your application, while stripping away the parts not used by your application.
As a comparison, a similar NDN video player implemented with NDNts and Shaka Player downloads 131KB of JavaScript, and received a "96" score from PageSpeed Insights:

There are dozens of static module bundlers to choose from, and I have made NDNts work with at least three of them. I found webpack easiest to use.
To install webpack, type the following in the terminal:
$ corepack pnpm add --save-dev webpack webpack-cli webpack-dev-server
devDependencies:
+ webpack ^5.90.3
+ webpack-cli ^5.1.4
+ webpack-dev-server ^5.0.2
package.json will be automatically updated to record webpack version numbers.
The HTML Page
The web application we are building today is a simple "ndnping" demo. It allows the user to enter a name prefix, sends four Interests under that prefix, and displays the responses.
Create a directory public, create a file public/index.html inside, and paste the following markup:
<!DOCTYPE html>
<meta charset="utf-8">
<title>NDNts ndnping demo</title>
<meta name="viewport" content="width=device-width, initial-scale=1.0">
<link rel="stylesheet" href="https://fastly.jsdelivr.net/gh/kognise/water.css@latest/dist/light.min.css">
<form id="app_form">
  <fieldset>
    <legend>NDNts ndnping demo</legend>
    <label>
      name prefix
      <input id="app_prefix" type="text">
    </label>
    <input id="app_button" type="submit" value="ping" disabled>
  </fieldset>
</form>
<pre id="app_log"></pre>
<script src="bundle.js"></script>
This webpage renders a <form> for the user to enter the name prefix.
The submit button is initially disabled, to prevent the user from activating the form before JavaScript is ready.
The page also uses Water.css for effortless CSS styling.
At the end of this webpage, a JavaScript file bundle.js is imported.
We do not need to write this file ourselves; instead, it will be generated by webpack.
The JavaScript Source Code
Make a directory src, create a file src/main.js inside, and paste the following code:
import { connectToNetwork } from "@ndn/autoconfig";
import { consume } from "@ndn/endpoint";
import { AltUri, Interest, Name } from "@ndn/packet";
import { delay } from "@ndn/util";

async function ping(evt) {
  evt.preventDefault();
  // Disable the submit button during function execution.
  const $button = document.querySelector("#app_button");
  $button.disabled = true;

  try {
    // Construct the name prefix <user-input>+/ping .
    const prefix = new Name(document.querySelector("#app_prefix").value).append("ping");
    const $log = document.querySelector("#app_log");
    $log.textContent = `ping ${AltUri.ofName(prefix)}\n`;

    // Generate a random number as initial sequence number.
    let seqNum = Math.trunc(Math.random() * 1e8);
    for (let i = 0; i < 4; ++i) {
      ++seqNum;
      // Construct an Interest with prefix + seqNum.
      const interest = new Interest(prefix.append(`${seqNum}`),
        Interest.MustBeFresh, Interest.Lifetime(1000));
      const t0 = Date.now();
      try {
        // Retrieve Data and compute round-trip time.
        const data = await consume(interest);
        const rtt = Date.now() - t0;
        $log.textContent += `\n${AltUri.ofName(data.name)} rtt=${rtt}ms`;
      } catch {
        // Report Data retrieval error.
        $log.textContent += `\n${AltUri.ofName(interest.name)} timeout`;
      }

      // Delay 500ms before sending the next Interest.
      await delay(500);
    }
  } finally {
    // Re-enable the submit button.
    $button.disabled = false;
  }
}

async function main() {
  // Connect to the global NDN network in one line.
  // This function queries the NDN-FCH service, and connects to the nearest router.
  await connectToNetwork();

  // Enable the form after connection succeeded.
  document.querySelector("#app_button").disabled = false;
  document.querySelector("#app_form").addEventListener("submit", ping);
}

window.addEventListener("load", main);
The main function is triggered when the webpage finishes loading.
It initiates a connection to the global NDN network, and then enables the submit button on the webpage.
The ping function is triggered when the user clicks the submit button.
The submit button is disabled during function execution to prevent conflicts.
It constructs four Interests whose names start with the user-specified name prefix, transmits them, and measures round-trip time to display in the on-page log section.
Interests are sent through the consume() function from @ndn/endpoint package.
The article Getting Started with NDNts in Node.js introduced a few features of consume() function, and they can be used here as well.
Configure and Run webpack-dev-server
Create a file webpack.config.cjs in the top-level directory, and paste the following:
const path = require("node:path");

module.exports = {
  mode: "production",
  devtool: "source-map",
  entry: "./src/main.js",
  output: {
    filename: "bundle.js",
    path: path.resolve(__dirname, "public"),
  },
  performance: {
    hints: false,
  },
  devServer: {
    static: {
      directory: path.resolve(__dirname, "public"),
    },
    allowedHosts: "all",
    port: 3333,
  },
};
This configuration instructs webpack to use src/main.js as input, compile and combine its dependencies, and write to public/bundle.js output file.
Then, open package.json and insert this section:
{
  "scripts": {
    "build": "webpack",
    "serve": "webpack serve"
  }
}
After that, start a development web server with this command:
$ corepack pnpm serve
<i> [webpack-dev-server] Project is running at:
<i> [webpack-dev-server] Loopback: http://localhost:3333/
asset bundle.js 192 KiB [emitted] [minimized] (name: main) 2 related assets
orphan modules 281 KiB [orphan] 103 modules
runtime modules 27.3 KiB 12 modules
cacheable modules 402 KiB
webpack 5.90.3 compiled successfully in 2794 ms
Now you can open a browser and access the web application at http://localhost:3333/.

To stop the development web server, press CTRL+C on the terminal.
Production Build
To generate a production build suitable for deployment on a web server, type this command:
$ corepack pnpm build

asset bundle.js 70 KiB [emitted] [minimized] (name: main) 1 related asset
orphan modules 250 KiB [orphan] 91 modules
cacheable modules 229 KiB
webpack 5.90.3 compiled successfully in 2177 ms
We can see that a public/bundle.js file is generated. The size "70 KiB" is before gzip compression; it would be 23KB gzipped.
The build command also generates a public/bundle.js.map file that contains debug information.
It has a larger size of 347KB, but this would not affect webpage performance because it is only downloaded when you (or a visitor) opens the browser's developer tools.
You may turn off the generation of this file by deleting devtool line in webpack.config.js file.
Deployment
After generating a production build with webpack (corepack pnpm build command), the public folder is a static website that can be deployed to any web server.
The fastest way to deploy a static website is to use Netlify.
- Visit www.netlify.com.
- Login with GitHub or another supported account.
- Drag the public folder and drop it into Netlify.
(if you are in VS Code, right click on the
publicfolder and select "Reveal in File Explorer", then drag from the file explorer) - The website is deployed instantly.

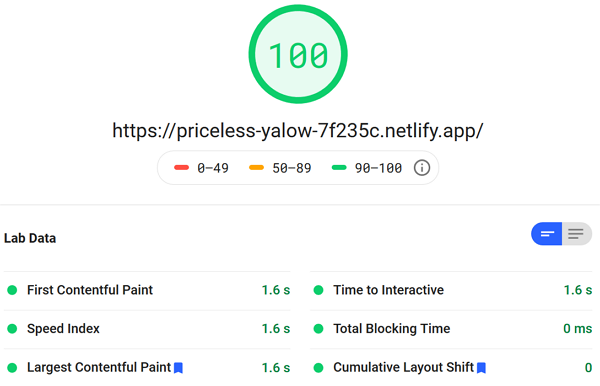
Now you can access the webpage from anywhere, including on mobile devices:

PageSpeed Insights gave this page a "100" score:

What's Inside bundle.js
If you are curious enough to open bundle.js, you'll see some completely unreadable mess like this:
!function(t){var e={};function n(r){if(e[r])return e[r].exports;var i=e[r]=
{i:r,l:!1,exports:{}};return t[r].call(i.exports,i,i.exports,n),i.l=!0,i.
exports}n.m=t,n.c=e,n.d=function(t,e,r){n.o(t,e)||Object.defineProperty(t,e,
{enumerable:!0,get:r})},n.r=function(t){"undefined"!=typeof Symbol&&Symbol.
toStringTag&&Object.defineProperty(t,Symbol.toStringTag,{value:"Module"}),
This is to be expected: JavaScript bundles are optimized for smaller download size and not meant to be human readable.
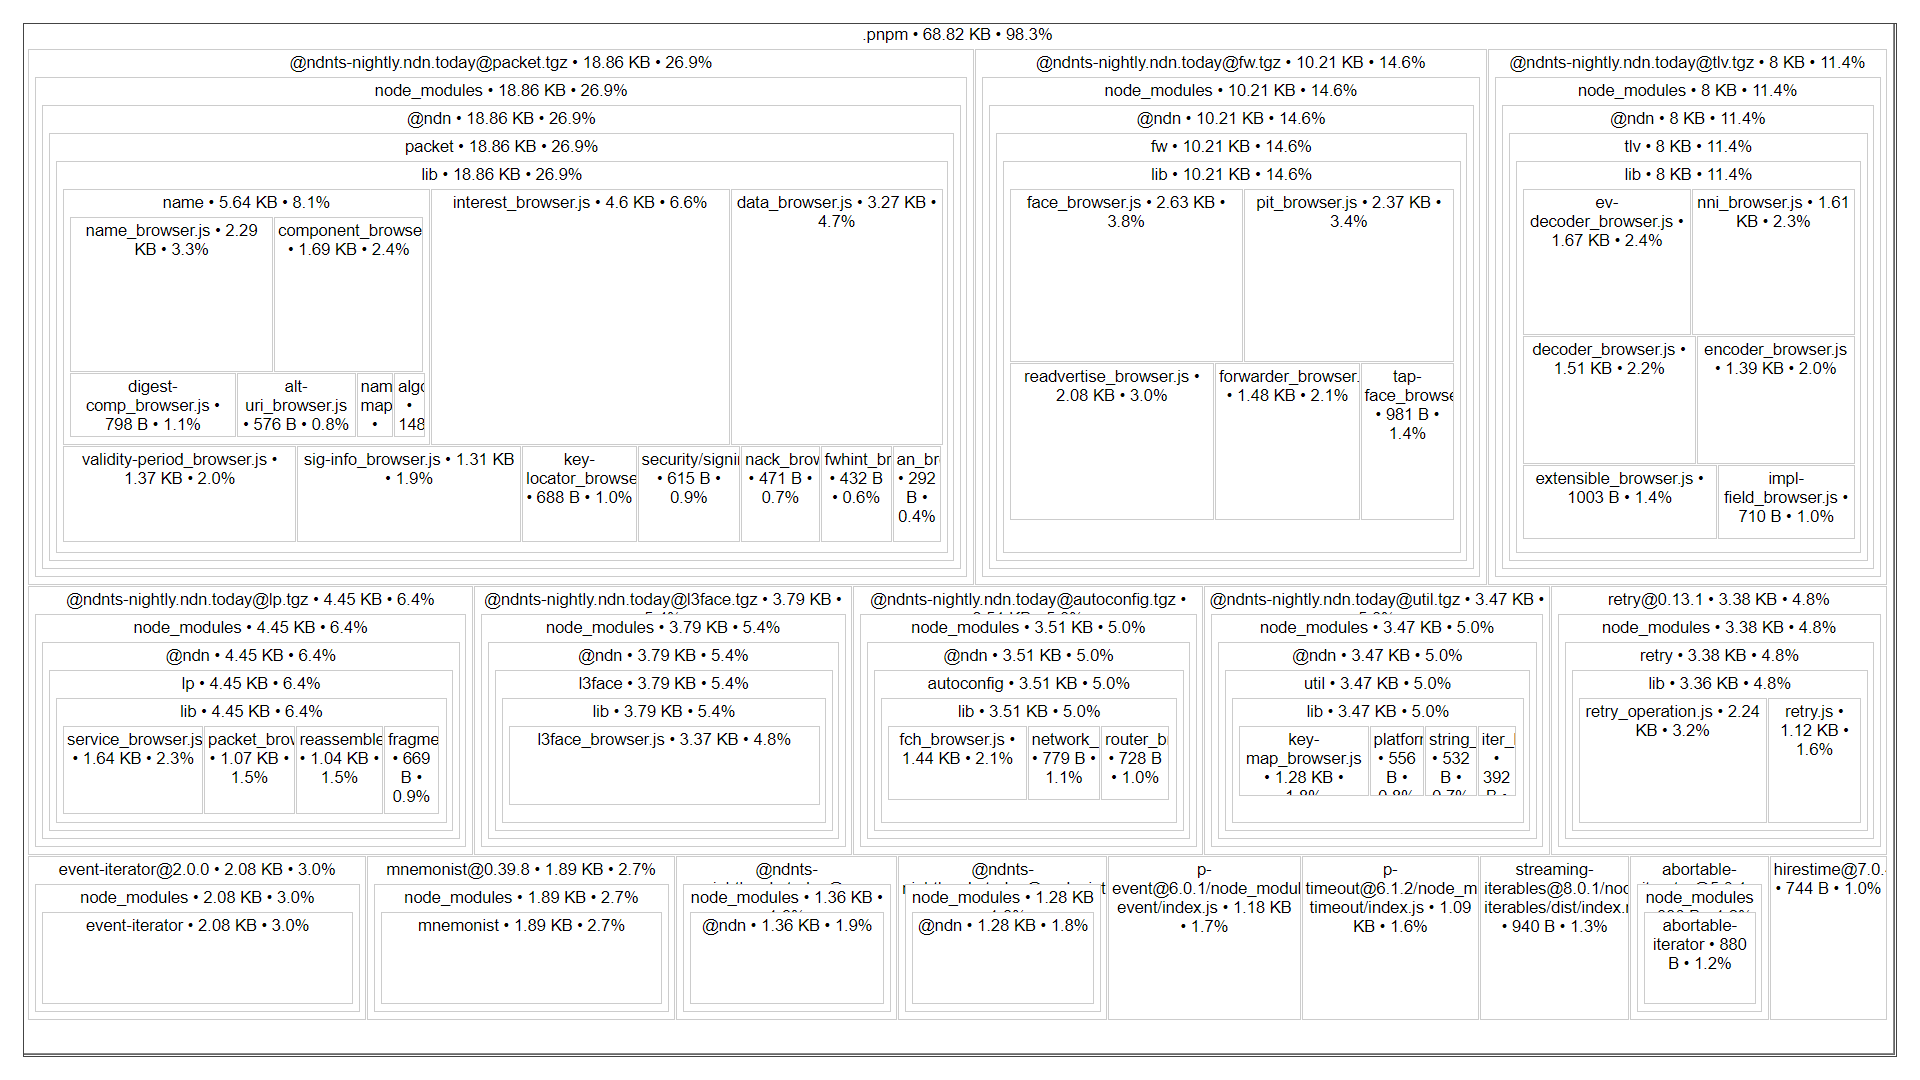
To gain an insight into what went into bundle.js, you can use source-map-explorer:
$ corepack pnpm dlx source-map-explorer public/bundle.js
public/bundle.js
  Unable to map 21/71678 bytes (0.03%)
It opens a browser window showing a diagram of the JavaScript modules included in the bundle. We can see that NDNts takes up 51.2KB in this bundle, while the rest belongs to other dependencies.

Conclusion
This article is a getting started guide of developing a web application using NDNts libraries and webpack module bundler. If you followed along, you have created a webpage that connects to the NDN testbed and sends "ping" Interests under a user-specified name prefix.
Source code in this article can be downloaded from NDNts-starter repository.