Four-key Piano on Fipsy FPGA

The newest addition to yoursunny.com's toy vault is Fipsy FPGA Breakout Board, a tiny circuit board offering a piece of Lattice MachXO2-256 field-programmable gate array (FPGA). After porting an SPI programmer to ESP32, it's time to write some Verilog! Blinky is boring, but I did it anyway. Then, I'm moving on to better stuff: a piano.

The piano is an acoustic music instrument played using a keyboard. When a key is pressed, a hammer strikes a string, causing it to resonate and produce sound at a certain frequency. A normal piano has 88 keys, and each key has a well-defined sound frequency. My "piano", built on Fipsy, has four keys, and uses a passive buzzer to produce sound.
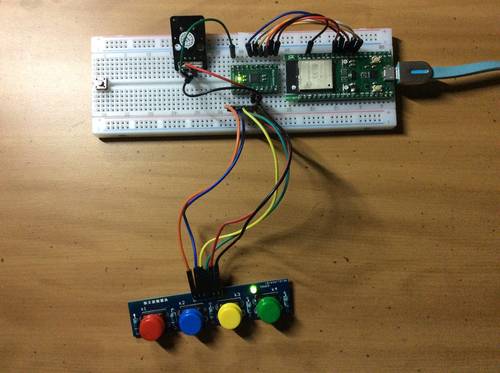
Fipsy FPGA connected to a buzzer and a keypad

Play Tone on Passive Buzzer with FPGA

A passive buzzer plays a tone controlled by an oscillating electronic signal at the desired frequency. In Arduino, the tone() function generates a square wave of a specified frequency, which can be used to control a passive buzzer.
Program Fipsy FPGA Breakout Board from ESP32

MocoMakers is creating Fipsy FPGA Breakout Board, a tiny circuit board offering a piece of Field-programmable gate array (FPGA). I worked with FPGA years ago in class projects, but didn't have access to a device after that. I backed the project, and received two Fipsy boards on Jul 20.

Fipsy is a very simple board: there is no power regulator or USB port. The official method to program the Fipsy is through the SPI port on a Raspberry Pi. It is easy to setup, and is a good use case for my Raspberry Pi Zero W (paid link), but there is one problem: It is good practice to power off the circuit when modifying hardware wiring. However, powering off a Raspberry Pi cleanly requires sending a shutdown command and waiting for a few seconds. If I just pull the power cord, I would risk corrupting the filesystem.

ESP32 microcontroller has SPI ports, and can be powered off and restarted very quickly. Can I program Fipsy from an ESP32?

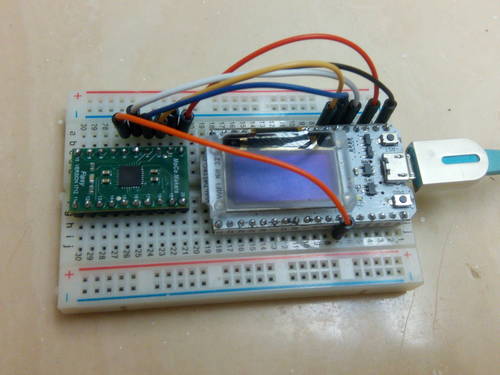
Fipsy connected to Heltec WiFi\_Kit\_32

Hardware side is easy. ESP32 has two available SPI ports, HSPI and VSPI, and I connected Fipsy to the Heltec WiFi_Kit_32 (paid link)'s HSPI port. All that remains is deciphering the spaghetti code of the official programmer. After a day of hard work, I got it working:

How to Compile Just One Kernel Module

I received two C.H.I.P computers in 2016. They come with Linux kernel 4.4.13, but the kernel had limited features. When I needed to use the fuse kernel module, I had to re-compile the entire kernel, which took a whole day. Two years later, I upgraded to a newer 4.4.138 kernel, built by community member kaplan2539. The kernel comes with more modules including fuse, which is a better situation than the original kernel.

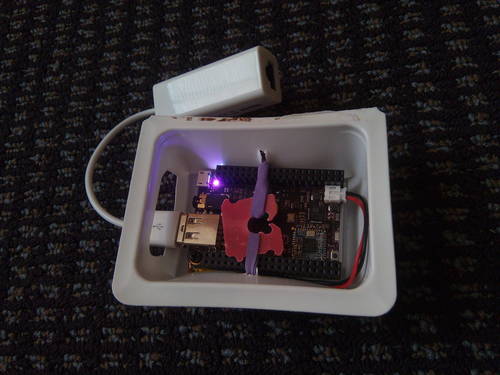
DM9601 USB Ethernet adapter plugged into a C.H.I.P computer

Recently I acquired a cheap USB Ethernet adapter. When I plugged it in, the kernel recognizes a USB device:

chip@chip-b:~$ lsusb | grep Ethernet
Bus 002 Device 002: ID 0fe6:9700 Kontron (Industrial Computer Source / ICS Advent) DM9601 Fast Ethernet Adapter

But there's no new NIC showing up in ip link command. A quick Google search of the USB ID 0fe6:9700 indicates that I need the dm9601 kernel module. But:

Watch @EmojiTetra Live on ESP32 OLED Display

@EmojiTetra is an online game resembling Tetris, hosted on Twitter platform. Every 20 minutes, the @EmojiTetra account posts a tweet that displays the current game board, along with a four-option poll that allows visitors to vote for the game's next move: left, right, down, rotate, or plummet.

a tweet by @EmojiTetra

I find this game interesting. To watch or participate in @EmojiTetra, I need to unlock my tablet, open Twitter app, search for "EmojiTetra", and scroll past the pinned tweet in order to see the current game move. In total, this process needs 17 taps. Looking at the 0.96 inch OLED display on my Heltec WiFi_Kit_32 (paid link) board, I'm thinking: can I play @EmojiTetra on an ESP32?

Twitter API

Twitter offers an API that allows applications to retrieve and post tweets. GET statuses/user_timeline resource, for example, retrieves a collection of the most recent tweets posted by a specific user. To watch the game, "user timeline" is exactly what I need to retrieve the current game state.

Moving Dot: How Many Displays Can You Fit on an ESP8266?

In yoursunny.com's toy vault, there is an assortment of LED displays. I'm wondering, how many LED displays can I fit on an ESP8266? So I built this "moving dot" demonstration, with two LED displays and a buzzer.

moving dot demo

The LED matrix serves as the game board. A dot appears on the matrix. In each time step, the dot randomly moves by one pixel or stays in the same position. The 4-digit displays current time step number. Whenever the dot reach any of the four corners, the buzzer plays a piano note selected between C3 and B5.

Hardware

Bill of materials

Ubuntu 16.04 NFD Development Machine

I shared how I setup my NFD development machine in 2017. Back then, NFD's minimum system requirement is Ubuntu 14.04 so my virtual machine is 14.04 as well. In May 2018, ndn-cxx started requiring Ubuntu 16.04, so it's time for a rebuild.

Vagrantfile for NFD Development in Ubuntu 16.04

Here's my new Vagrantfile:

$vmname = "devbox"
$sshhostport = 2222

$deps = <<SCRIPT
export DEBIAN_FRONTEND=noninteractive
apt-get update
apt-get dist-upgrade -yq
apt-get install -yq git build-essential gdb valgrind libssl-dev libsqlite3-dev libboost-all-dev pkg-config libpcap-dev doxygen graphviz python-sphinx python-pip
pip install sphinxcontrib-doxylink sphinxcontrib-googleanalytics
SCRIPT

Vagrant.configure(2) do |config|
  config.vm.box = "bento/ubuntu-16.04"
  config.vm.network :forwarded_port, guest: 22, host: $sshhostport, id: "ssh"
  config.vm.provider "virtualbox" do |vb|
    vb.name = $vmname
    vb.memory = 6144
    vb.cpus = 8
  end
  config.vm.provision "deps", type: "shell", inline: $deps
  config.vm.provision "hostname", type: "shell", inline: "echo " + $vmname + " > /etc/hostname; hostname " + $vmname
  config.vm.provision "sshpvtkey", type: "file", source: "~/.ssh/id_rsa", destination: ".ssh/id_rsa"
  config.vm.provision "sshpubkey", type: "file", source: "~/.ssh/id_rsa.pub", destination: ".ssh/id_rsa.pub"
  config.vm.provision "sshauth", type: "shell", inline: "cd .ssh; cat id_rsa.pub >> authorized_keys"
  config.vm.provision "gitconfig", type: "file", source: "~/.gitconfig", destination: ".gitconfig"
end

Differences from 2017

Yuma Mega

Since my spontaneous visit of Pima Air & Space Museum on my 2015 birthday, I started a tradition of having a little road trip for every birthday. I rode a bike to Sweetwater Wetlands Park to see some birds with Tucson Audubon Society on my 2016 birthday. When my 2017 birthday came close, I planned something big: I wanted to attend the Yuma Mega, the biggest geocaching event in the Southwest region.

Finding the Event

I started geocaching as a hobby in 2013. Geocaching for me is mostly an individual sport: I rode bikes all over Tucson metro area, lift up lamp post covers and poke my hand into guardrails to find mint containers hidden within. Event Caches, on the other hand, are special geocaches that allow geocachers to gather and socialize. I browse Geocaching.com's event listing from time to time, and attend those events regularly. Normally, 15~30 people would show up in a local restaurant or city park. People would tell their stories, and plan out-of-state trips to search for large number of geocaches.

Yuma Mega is not just any event, but a "Mega-Event Cache". Geocaching HQ awards Mega status to events attracting more than 500 geocachers. I heard about Yuma Mega in 2015, but the date was adjacent to a conference trip so I wasn't able to arrange it. 2017's Yuma Mega event falls on Sunday Feb 12, which happens to be my birthday. 2017 is also my last year living in Arizona. It was "now or never", so I have to attend Yuma Mega!

I made up my mind on Nov 24, 2016, and booked a rental car and a motel room for the trip. Both reservations were cancelable in case there's a paper deadline on that weekend, but thankfully there wasn't one, so I'm greenlighted for the trip.

GPU Accelerated Contour Detection on PiCamera

Earlier this month, I spent a week building OpenCV 3.2.0, with the intention to reproduce the contour detection demo I witnessed at MoCoMakers meetup. I successfully made contour detection working on PiCamera through MJPEG streaming. P.S. Can you tell the Hack Arizona 2016 shirt?

contour on PiCamera

How MocoMakers's Demo Works

def makeContour(image):
    gray = cv2.cvtColor(image, cv2.COLOR_BGR2GRAY)
    gray = cv2.GaussianBlur(gray, (3, 3), 0)
    edged = auto_canny(gray)

def auto_canny(image, sigma=0.33):
    v = np.median(image)
    lower = int(max(0, (1.0 - sigma) * v))
    upper = int(min(255, (1.0 + sigma) * v))
    edged = cv2.Canny(image, lower, upper)
    return edged

Their code works with a MJPEG stream from an Android phone. It extracts a JPEG frame from the video stream, processes the image through makeContour function, and displays the result. The makeContour function converts the RGB image to grayscale, blurs the grayscale image, and runs the Canny Edge Detection algorithm.

Install OpenCV 3.2.0 on Raspberry Pi Zero W in 15 Minutes

OpenCV, or Open Source Computer Vision Library, is an open source computer vision and machine learning software. It works on Raspberry Pi computers, and can process photos captured by the Raspberry Pi Camera Module.

OpenCV has two supported versions: 2.4.x and 3.x. New features are being added to 3.x branch, while 2.4.x only receives bug fixes and efficiency fixes. It is recommended that new developments should use OpenCV 3.x, to take advantage of new features. However, the official operating system for the Raspberry Pi, Raspbian Stretch, comes with OpenCV 2.4.9. While I am not yet familiar with OpenCV algorithms, one thing notably missing from OpenCV 2.4.9 is a Python 3 binding.

I wanted to have OpenCV 3 running in Raspbian Stretch on a Raspberry Pi Zero W. Unable to find existing packages for Pi Zero and Stretch, I had no choice but to compile my own OpenCV 3. I decided to do it the proper way: build a backported Debian package. This method is superior to installing from the source code, because the packages can easily be deployed to other Raspberry Pi Zero W computers. I followed the Simple Backport Creation instruction, and spent a week building the packages. Now I'm sharing my compiled packages, so that you can use them if you dare.

What You Need

The Quest of Building OpenCV 3.2.0 Debian Packages on Raspberry Pi Zero W

The newest members in my toy collection are a Raspberry Pi Zero W (paid link) and a NoIR Camera Module (paid link), purchased in Dec 2017. Recently, I witnessed an impressive Contour Detection demo at MoCoMakers meetup. I read their source code, and it has a dependency on cv2 Python package. Therefore, the first step to get it working on my RPi Zero would be installing OpenCV that provides cv2 package.

While Raspbian Stretch offers a python-opencv package, it is version 2.4.9 released in 2014, and it only works with Python 2 but not Python 3. Since I'm starting from scratch, I wanted to develop on newer platforms: OpenCV 3.x and Python 3.

Many online tutorials suggest compiling OpenCV from source code. There are also a few sites offering pre-compiled tarballs, but these are either compiled for the Raspberry Pi 3, or built for Raspbian Jessie; neither would be compatible with my Raspberry Pi Zero W running Raspbian Stretch. Therefore, I started my quest to build OpenCV 3 for Pi Zero.

Debian Package > Source Code

When I first learned Linux, the standard process of installing software is wget, tar xzvf, ./configure, make, make install. Today, this is no longer recommended because software installed this way is difficult to remove and could cause conflicts. Instead, it is recommended to install everything from Debian packages.