Intel iGPU VAAPI in Unprivileged LXC 4.0 Container

Background

I recently bought a DELL OptiPlex 7040 Micro (paid link) desktop computer and wanted to operate it as a dedicated server. I installed Debian 11 on the computer, and placed it into the closet to be accessed over SSH only. To keep the host machine stable, I decide to run most workloads in LXC containers, which are said to be Fast-as-Metal. Since I operate my own video streaming website, I have an LXC container for encoding the videos.

The computer comes with an Intel Core i5-6500T processor. It has 4 hardware cores running at 2.50GHz frequency, and belongs to the Skylake family. FFmpeg is happily encoding my videos on this CPU.

As I read through the processor specification, I noticed this section:

  • Processor Graphics: Intel® HD Graphics 530
    • Processor Graphics indicates graphics processing circuitry integrated into the processor, providing the graphics, compute, media, and display capabilities.
  • Intel® Quick Sync Video: Yes
    • Intel® Quick Sync Video delivers fast conversion of video for portable media players, online sharing, and video editing and authoring.

Today I Learned: openat()

fopen and open

In C programming language, the <stdio.h> header supplies functions for file input and output. To open a file, we usually use the fopen function. It is defined by the C language standard and works in every operating system.

Working at a lower level, there's also the open function. It is a system call provided by the Linux kernel and exposed through glibc.

Both fopen and open have an input parameter: the file pathname, as a NUL-terminated string. These two functions are declared like this:

FILE* fopen(const char* filename, const char* mode);

int open(const char* pathname, int flags);

IPv6 Neighbor Discovery Responder for KVM VPS

I Want IPv6 for Docker

I'm playing with Docker these days, and I want IPv6 in my Docker containers. The best guide for enabling IPv6 in Docker is how to enable IPv6 for Docker containers on Ubuntu 18.04. The first method in that article assigns private IPv6 addresses to containers, and uses IPv6 NAT similar to how Docker handles IPv4 NAT. I quickly got it working, but I noticed an undesirable behavior: Network Address Translation (NAT) changes the source port number of outgoing UDP datagrams, even if there's a port forwarding rule for inbound traffic; consequently, a UDP flow with the same source and destination ports is being recognized as two separate flows.

$ docker exec nfd nfdc face show 262
    faceid=262
    remote=udp6://[2001:db8:f440:2:eb26:f0a9:4dc3:1]:6363
     local=udp6://[fd00:2001:db8:4d55:0:242:ac11:4]:6363
congestion={base-marking-interval=100ms default-threshold=65536B}
       mtu=1337
  counters={in={25i 4603d 2n 1179907B} out={11921i 14d 0n 1506905B}}
     flags={non-local permanent point-to-point congestion-marking}
$ docker exec nfd nfdc face show 270
    faceid=270
    remote=udp6://[2001:db8:f440:2:eb26:f0a9:4dc3:1]:1024
     local=udp6://[fd00:2001:db8:4d55:0:242:ac11:4]:6363
   expires=0s
congestion={base-marking-interval=100ms default-threshold=65536B}
       mtu=1337
  counters={in={11880i 0d 0n 1498032B} out={0i 4594d 0n 1175786B}}
     flags={non-local on-demand point-to-point congestion-marking}

The second method in that article allows every container to have a public IPv6 address. It avoids NAT and the problems that come with it, but requires the host to have a routed IPv6 subnet. However, routed IPv6 is hard to come by on KVM servers, because virtualization platform such as Virtualizor does not support routed IPv6 subnets, but can only provide on-link IPv6.

On-Link IPv6 vs Routed IPv6

yoursunny.com Disaster Recovery Plan: 104 Minutes Downtime, No Tears

The OVH fire taught us the importance of having a disaster recovery plan for your website and online services. In 2017, I rebuilt yoursunny.com and moved everything from configuration to content into git repositories. One of the reasons was that, the git repository could serve as a backup of the website, so that I can recover the site from a data loss.

uptime last 24 hours, vps4 server, yoursunny.com website

Today, I was forced to execute (part of) my disaster recovery plan. The result was: website is successfully recovered after 1 hour and 44 minutes of downtime.

🟥 Down

When I waked up this morning, there were several alert emails from UptimeRobot telling me that my website was down, up, down, and up again. At the same time, I also received alerts that the VPS hosting the website was not responding to ping. I ignored those alerts, thinking that they would resolve itself in a few minutes.

yoursunny.com is Served by Caddy

The last rebuild of yoursunny.com was in Spring 2017, when I moved the whole website into git repositories. It's been more than 3 years, and I think I should share an update on a few changes in the stack that serves this website.

History of HTTP Servers Behind yoursunny.com

Since 2011, my HTTP server of choice was lighttpd. Then, I have PHP running in FastCGI mode to serve the dynamic pages. It works, but I don't really like the lighttpd's script-like configuration structure. Moreover, there were suspected memory leaks in my setup, so that I had to use a cron job to restart the HTTP server weekly.

I keep hearing good words about nginx, as well as the benefits of running PHP in FPM mode. In 2013, I made the switch to nginx and PHP-FPM. The declarative configuration of nginx is easy to understand and makes sense to me.

HTTPS came to yoursunny.com at the end of 2015. Like many other websites, the TLS certificates were issued by Let's Encrypt, and requested through certbot command line client. One problem is that, my VPS at the time had only 64MB memory, and certbot would not work in such a small amount of memory. I had to request the TLS certificate on my laptop, and then upload it to the VPS.

Enable IPv4 Access in EUserv IPv6-only VS2-free

EUserv is a virtual private server (VPS) provider in Germany. Notably, they offer a container-based Linux server, VS2-free, free of charge. VS2-free comes with one 1GHz CPU core, 1GB memory, and 10GB storage. Although I already have more than enough servers to play with, who doesn't like some more computing resources for free?

There's one catch: the VS2-free is IPv6-only. It neither has a public IPv4 address, nor offers NAT-based IPv4 access. All you can have is a single /128 IPv6 address.

$ ip addr
1: lo: <LOOPBACK,UP,LOWER_UP> mtu 65536 qdisc noqueue state UNKNOWN group default qlen 1000
    link/loopback 00:00:00:00:00:00 brd 00:00:00:00:00:00
    inet 127.0.0.1/8 scope host lo
       valid_lft forever preferred_lft forever
    inet6 ::1/128 scope host
       valid_lft forever preferred_lft forever
546: eth0@if547: <BROADCAST,MULTICAST,UP,LOWER_UP> mtu 1500 qdisc noqueue state UP group default qlen 1000
    link/ether b2:77:4b:c0:eb:0b brd ff:ff:ff:ff:ff:ff link-netnsid 0
    inet6 2001:db8:6:1::6dae/128 scope global
       valid_lft forever preferred_lft forever
    inet6 fe80::5ed4:d66f:bd01:6936/64 scope link
       valid_lft forever preferred_lft forever

If I attempt to access an IPv4-only destination, a "Network is unreachable" error appears:

$ host lgger.nexusbytes.com
lgger.nexusbytes.com has address 46.4.199.225
$ ping -n -c 4 lgger.nexusbytes.com
connect: Network is unreachable

How to Select Default IPv6 Source Address for Outbound Traffic in OpenVZ 7

I bought a few Virtual Private Servers (VPS) on Black Friday, and have been busy setting them up. Nowadays, most VPS comes with an IPv6 subnet that contains millions of possible addresses. Initially, only one IPv6 address is assigned to the server, but the user can assign additional addresses as desired. Given that I plan to run multiple services within a server, I added a few more IPv6 addresses so that each service can have a unique IPv6 address.

One of my servers is using OpenVZ 7 virtualization technology, in which I installed Debian 10 operating system. Commonly, OpenVZ 7 uses virtual network device (venet) that does not have a MAC address. venet devices are not fully IPv6 compliant, but still works if you statically assign IPv6 addresses. Moreover, every IP address used in a container must be configured from the host node, because venet would drop ip-packets from the container with a source address, and in the container with the destination address, which is not corresponding to an ip-address of the container. Therefore, I must use the VPS control panel, in this case SolusVM, to assign IPv6 addresses to my server:

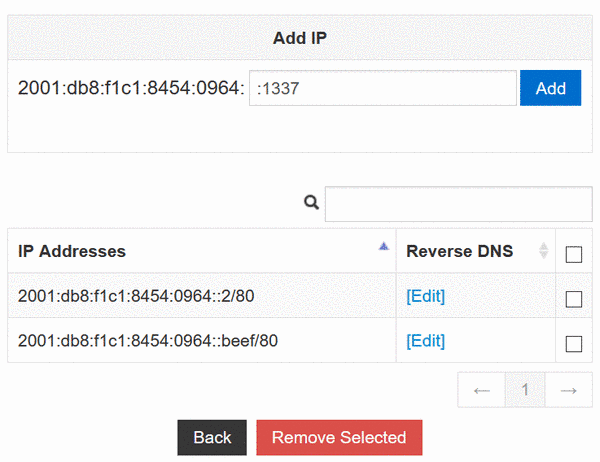
IPv6 Subnet management in SolusVM

In the Add IP section, the IPv6 subnet prefix 2001:db8:f1c1:8454:0964: is already shown. Notice that I am putting a colon (:) in front of the suffix 1337, so that they concatenate to the full address 2001:db8:f1c1:8454:0964::1337. Forgetting this colon would cause "Invalid Entry" error.

After making this change in the SolusVM control panel, the /etc/network/interface file on my server is updated automatically:

How to Select Default IPv6 Source Address for Outbound Traffic with Netplan

I bought a few Virtual Private Servers (VPS) on Black Friday, and have been busy setting them up. Nowadays, most VPS comes with an IPv6 subnet that contains millions of possible addresses. Initially, only one IPv6 address is assigned to the server, but the user can assign additional addresses as desired. Given that I plan to run multiple services within a server, I added a few more IPv6 addresses so that each service can have a unique IPv6 address.

One of my servers is using KVM virtualization technology, in which I installed Ubuntu 20.04 operating system manually from an ISO image. Unlike a template-based installation, an ISO-installed Ubuntu 20.04 system manages its networks using Netplan, a backend-agnostic network configuration utility that generates network configuration from YAML files. Most VPS control panels, including SolusVM and Virtualizer, are unable to generate the YAML files needed by Netplan. IPv4 works out of box via DHCP, but IPv6 has to be configured manually. To assign two IPv6 addresses to my server, I need to write the following in /etc/netplan/01-netcfg.yaml:

network:
  version: 2
  ethernets:
    ens3:
      dhcp4: true
      addresses:
        - 2001:db8:30fa:5877::1/64
        - 2001:db8:30fa:5877::beef/64
      routes:
        - to: ::/0
          via: 2001:db8:30fa::1
          on-link: true
      nameservers:
        addresses:
        - 2001:4860:4860::8888
        - 2606:4700:4700::1111

I intend to host my secret beef recipes on its unique IPv6 address 2001:db8:30fa:5877::beef, and use the other address 2001:db8:30fa:5877::1 for outbound traffic such as pings and traceroutes. However, I noticed that the wrong address is being selected for outgoing packets:

$ ping 2001:db8:57eb:8479::2

$ sudo tcpdump -n icmp6
tcpdump: verbose output suppressed, use -v or -vv for full protocol decode
listening on venet0, link-type LINUX_SLL (Linux cooked), capture size 262144 bytes
00:44:48.704099 IP6 2001:db8:30fa:5877::beef > 2001:db8:57eb:8479::2: ICMP6, echo request, seq 1, length 64
00:44:48.704188 IP6 2001:db8:57eb:8479::2 > 2001:db8:30fa:5877::beef: ICMP6, echo reply, seq 1, length 64
00:44:49.704011 IP6 2001:db8:30fa:5877::beef > 2001:db8:57eb:8479::2: ICMP6, echo request, seq 2, length 64
00:44:49.704099 IP6 2001:db8:57eb:8479::2 > 2001:db8:30fa:5877::beef: ICMP6, echo reply, seq 2, length 64

NDN-DPDK: NDN Forwarding at 100 Gbps on Commodity Hardware

Presented at: 7th ACM Conference on Information-Centric Networking (ICN 2020)

Since the Named Data Networking (NDN) data plane requires name-based lookup of potentially large tables using variable-length hierarchical names as well as per-packet state updates, achieving high-speed NDN forwarding remains a challenge. In order to address this gap, we developed a high-performance NDN router capable of reaching forwarding rates higher than 100 Gbps while running on commodity hardware. In this paper we present our design and discuss its tradeoffs. We achieved this performance through several optimization techniques that include adopting better algorithms and efficient data structures, as well as making use of the parallelism offered by modern multi-core CPUs and multiple hardware queues with user-space drivers for kernel bypass. Our open-source forwarder is the first software implementation of NDN to exceed 100 Gbps throughput while supporting the full protocol semantics. We also present the results of extensive benchmarking carried out to assess a number of performance dimensions and to diagnose the current bottlenecks in the packet processing pipeline for future scalability enhancements. Finally, we identify future work which includes hardware-assisted ingress traffic dispatching, dynamic load balancing across forwarding threads, and novel caching solutions to accommodate on-disk content stores.

Read full paper at ACM Digital Library: NDN-DPDK: NDN Forwarding at 100 Gbps on Commodity Hardware

NDN-DPDK logo

Install Debian 10 on Netgate SG-2220 via Serial Port with iSCSI Disk

I get my hands on a Netgate SG-2220 network computer. It comes preinstalled with either pfSense firewall software, or CentOS in the case of DPDK-in-a-box edition. However, I'm more familiar with Debian based operating systems. Can I install Debian on the Netgate SG-2220?

The Console Port

Hardware specification of the Netgate SG-2220 includes:

  • Intel Atom C2338 processor, dual core at 1.7 GHz
  • 2GB RAM
  • 4GB eMMC storage
  • one USB 2.0 port
  • two 1 Gbps Ethernet adapters

Notably missing is a VGA or HDMI port to connect to a monitor. Instead, this computer offers a mini-USB "console port". It is a UART serial port with a USB-UART bridge chip already included, unlike the C.H.I.P $9 computer that only provides serial over pin headers.