Geocaching in 2020

I started geocaching in 2013 when I lived in Tucson, Arizona. I moved to Montgomery County, Maryland in late 2017, and became a Premium Member on Geocaching.com at the beginning of 2018 so that I can find thousands of Premium-only caches around here.

The Normal Months

Since 2019, I hooked up with Georick402, Maryland's top hider, to go geocaching together on weekends. I have no transportation, and he has no brain, so I solve the mystery caches, and he drives me to them; it's a win-win partnership. This relationship, of course, continued into 2020.

2020-01-26 yoursunny and Georick402 at GC2HT7Q

In January and February, we went out together almost every weekend. We completed a few high-difficulty Multi caches such as the Woodrow Wilson Bridge Challenge, found Virginia's top-rated Letterbox hybrid Roo's Runaway, took the Historic White's Ferry, and attended Leap Day event(s) on February 29.

How to Host a Website in Oracle Cloud Free Tier

Oracle Cloud is a cloud computing service offered by Oracle Corporation. Oracle Cloud has a generous free tier that offers two "always free" Micro instances with the following specification:

  • KVM virtualization
  • 1/8 CPU cores (AMD EPYC 7551)
  • 1GB memory
  • 47GB disk storage
  • 1 IPv4 address
  • up to 32 IPv6 addresses
  • 50Mbps Internet bandwidth

I signed up for Oracle Cloud, so that I can have some more free computing resources to play with. The sign-up procedure requires a credit card for identity confirmation purpose, but the credit card will not be charged. During sign-up, there's a choice of home region, which determines the location of VM instances; once selected, it cannot be changed in the future.

A common use case for a virtual machine is to host a website. Due to the firewalls, hosting a website on Oracle Cloud needs a few more steps. Here's exactly how to deploy a website in a Oracle Cloud Free Tier VM instance.

UPDATED 2022-01-27: Oracle Cloud now supports IPv6. Instructions are updated to enable IPv6 on the web server.

Enable IPv4 Access in EUserv IPv6-only VS2-free

EUserv is a virtual private server (VPS) provider in Germany. Notably, they offer a container-based Linux server, VS2-free, free of charge. VS2-free comes with one 1GHz CPU core, 1GB memory, and 10GB storage. Although I already have more than enough servers to play with, who doesn't like some more computing resources for free?

There's one catch: the VS2-free is IPv6-only. It neither has a public IPv4 address, nor offers NAT-based IPv4 access. All you can have is a single /128 IPv6 address.

$ ip addr
1: lo: <LOOPBACK,UP,LOWER_UP> mtu 65536 qdisc noqueue state UNKNOWN group default qlen 1000
    link/loopback 00:00:00:00:00:00 brd 00:00:00:00:00:00
    inet 127.0.0.1/8 scope host lo
       valid_lft forever preferred_lft forever
    inet6 ::1/128 scope host
       valid_lft forever preferred_lft forever
546: eth0@if547: <BROADCAST,MULTICAST,UP,LOWER_UP> mtu 1500 qdisc noqueue state UP group default qlen 1000
    link/ether b2:77:4b:c0:eb:0b brd ff:ff:ff:ff:ff:ff link-netnsid 0
    inet6 2001:db8:6:1::6dae/128 scope global
       valid_lft forever preferred_lft forever
    inet6 fe80::5ed4:d66f:bd01:6936/64 scope link
       valid_lft forever preferred_lft forever

If I attempt to access an IPv4-only destination, a "Network is unreachable" error appears:

$ host lgger.nexusbytes.com
lgger.nexusbytes.com has address 46.4.199.225
$ ping -n -c 4 lgger.nexusbytes.com
connect: Network is unreachable

How to Select Default IPv6 Source Address for Outbound Traffic in OpenVZ 7

I bought a few Virtual Private Servers (VPS) on Black Friday, and have been busy setting them up. Nowadays, most VPS comes with an IPv6 subnet that contains millions of possible addresses. Initially, only one IPv6 address is assigned to the server, but the user can assign additional addresses as desired. Given that I plan to run multiple services within a server, I added a few more IPv6 addresses so that each service can have a unique IPv6 address.

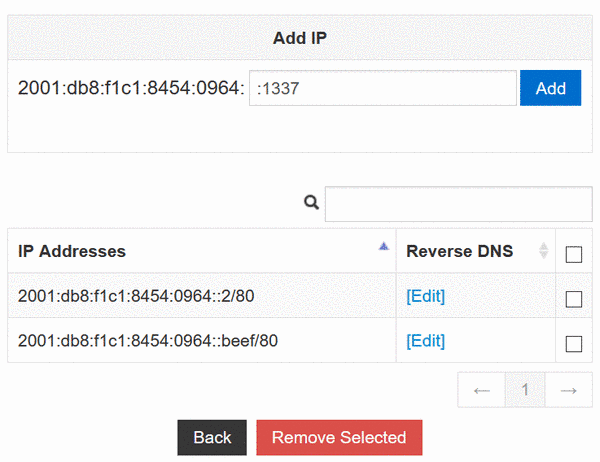
One of my servers is using OpenVZ 7 virtualization technology, in which I installed Debian 10 operating system. Commonly, OpenVZ 7 uses virtual network device (venet) that does not have a MAC address. venet devices are not fully IPv6 compliant, but still works if you statically assign IPv6 addresses. Moreover, every IP address used in a container must be configured from the host node, because venet would drop ip-packets from the container with a source address, and in the container with the destination address, which is not corresponding to an ip-address of the container. Therefore, I must use the VPS control panel, in this case SolusVM, to assign IPv6 addresses to my server:

IPv6 Subnet management in SolusVM

In the Add IP section, the IPv6 subnet prefix 2001:db8:f1c1:8454:0964: is already shown. Notice that I am putting a colon (:) in front of the suffix 1337, so that they concatenate to the full address 2001:db8:f1c1:8454:0964::1337. Forgetting this colon would cause "Invalid Entry" error.

After making this change in the SolusVM control panel, the /etc/network/interface file on my server is updated automatically:

How to Select Default IPv6 Source Address for Outbound Traffic with Netplan

I bought a few Virtual Private Servers (VPS) on Black Friday, and have been busy setting them up. Nowadays, most VPS comes with an IPv6 subnet that contains millions of possible addresses. Initially, only one IPv6 address is assigned to the server, but the user can assign additional addresses as desired. Given that I plan to run multiple services within a server, I added a few more IPv6 addresses so that each service can have a unique IPv6 address.

One of my servers is using KVM virtualization technology, in which I installed Ubuntu 20.04 operating system manually from an ISO image. Unlike a template-based installation, an ISO-installed Ubuntu 20.04 system manages its networks using Netplan, a backend-agnostic network configuration utility that generates network configuration from YAML files. Most VPS control panels, including SolusVM and Virtualizer, are unable to generate the YAML files needed by Netplan. IPv4 works out of box via DHCP, but IPv6 has to be configured manually. To assign two IPv6 addresses to my server, I need to write the following in /etc/netplan/01-netcfg.yaml:

network:
  version: 2
  ethernets:
    ens3:
      dhcp4: true
      addresses:
        - 2001:db8:30fa:5877::1/64
        - 2001:db8:30fa:5877::beef/64
      routes:
        - to: ::/0
          via: 2001:db8:30fa::1
          on-link: true
      nameservers:
        addresses:
        - 2001:4860:4860::8888
        - 2606:4700:4700::1111

I intend to host my secret beef recipes on its unique IPv6 address 2001:db8:30fa:5877::beef, and use the other address 2001:db8:30fa:5877::1 for outbound traffic such as pings and traceroutes. However, I noticed that the wrong address is being selected for outgoing packets:

$ ping 2001:db8:57eb:8479::2

$ sudo tcpdump -n icmp6
tcpdump: verbose output suppressed, use -v or -vv for full protocol decode
listening on venet0, link-type LINUX_SLL (Linux cooked), capture size 262144 bytes
00:44:48.704099 IP6 2001:db8:30fa:5877::beef > 2001:db8:57eb:8479::2: ICMP6, echo request, seq 1, length 64
00:44:48.704188 IP6 2001:db8:57eb:8479::2 > 2001:db8:30fa:5877::beef: ICMP6, echo reply, seq 1, length 64
00:44:49.704011 IP6 2001:db8:30fa:5877::beef > 2001:db8:57eb:8479::2: ICMP6, echo request, seq 2, length 64
00:44:49.704099 IP6 2001:db8:57eb:8479::2 > 2001:db8:30fa:5877::beef: ICMP6, echo reply, seq 2, length 64

Travis CI Pricing Change - Usage based Billing

"Welcome to Travis CI!"

This morning I waked up to an email titled Welcome to Travis CI!.

Travis CI is a cloud-based Continuous Integration platform that automatically compiles and tests my code whenever I push a commit to GitHub, and warns me by email if there is an error. I started using Travis CI in 2014, so it feels weird to receive a "welcome" email today.

The email reads:

You are on Free.

You have 1,000 credits left - these will begin counting down automatically as soon as you run your first build. You can use your credits to build on both private and open-source repositories using Linux, macOS, and Windows OS. 1,000 credits will be replenished automatically monthly. Additional Credits purchase is not available for Free Plan.

Where does GMT-0456 Timezone Come From?

Recently, someone on the DCTech Slack community asked why the Date.prototype.toDateString function is having an off-by-one error:

new Date("2020-10-17").toDateString();
"Fri Oct 16 2020"

My immediate response was: timezone. The group then proceeded to discover that the Date constructor would interpret a date-only string as being in UTC timezone. Washington, DC uses Eastern Daylight Time that is four hours behind UTC, so the timezone of the constructed Date object is 20:00:00 local time on the previous date. Since toDateString uses local time, it prints as the previous date.

After that, I started testing some boundary conditions:

new Date("0001-01-01").toString()
"Sun Dec 31 0000 19:03:58 GMT-0456 (Eastern Standard Time)"

new Date("0000-01-01").toString()
"Fri Dec 31 -0001 19:03:58 GMT-0456 (Eastern Standard Time)"

Wandering in Las Vegas

After being busy with virtual conferences and hackathons, I finally got some time to return to my virtual travels. This week I'm going to Las Vegas, the entertainment capital of the world.

Welcome to Fabulous Las Vegas sign, 2013-12-17

Am I in Las Vegas?

Christmas 2011, after visiting San Diego and Los Angeles theme parks, two schoolmates and I drove 6 hours to Las Vegas. We walked around the vicinity of our hotel, and saw what appears to be Statue of Liberty in front of a hotel. From what I remember from watching The Amazing Race (paid link), this statue should be in New York. Although my geographic knowledge was limited at the time, I knew we were not in New York. Instead, we were in front of New York-New York Hotel and Casino, designed to evoke the New York City skyline. This Statue of Liberty is a smaller replica of the real thing.

Statue of Liberty replica in front of New York-New York Hotel and Casino, 2011-12-26

NDN-DPDK: NDN Forwarding at 100 Gbps on Commodity Hardware

Presented at: 7th ACM Conference on Information-Centric Networking (ICN 2020)

Since the Named Data Networking (NDN) data plane requires name-based lookup of potentially large tables using variable-length hierarchical names as well as per-packet state updates, achieving high-speed NDN forwarding remains a challenge. In order to address this gap, we developed a high-performance NDN router capable of reaching forwarding rates higher than 100 Gbps while running on commodity hardware. In this paper we present our design and discuss its tradeoffs. We achieved this performance through several optimization techniques that include adopting better algorithms and efficient data structures, as well as making use of the parallelism offered by modern multi-core CPUs and multiple hardware queues with user-space drivers for kernel bypass. Our open-source forwarder is the first software implementation of NDN to exceed 100 Gbps throughput while supporting the full protocol semantics. We also present the results of extensive benchmarking carried out to assess a number of performance dimensions and to diagnose the current bottlenecks in the packet processing pipeline for future scalability enhancements. Finally, we identify future work which includes hardware-assisted ingress traffic dispatching, dynamic load balancing across forwarding threads, and novel caching solutions to accommodate on-disk content stores.

Read full paper at ACM Digital Library: NDN-DPDK: NDN Forwarding at 100 Gbps on Commodity Hardware

NDN-DPDK logo

NDNts Demo at NDN Community Meeting 2020

NDN Community Meeting is an annual event that brings together a large community of researchers from academia, industry, and government, as well as users and other parties interested in the development of Named Data Networking (NDN) technology. Having no peer review process, it is a prime opportunity to showcase my personal projects to the community. I demo'ed my ndn-js home surveillance camera at NDNcomm 2018. This time, I decide to demo my flagship product, NDNts: NDN Libraries for the Modern Web.

The Demo Video

NDNts is a set of libraries with many different features, where do I start? I decide to select a subset of unique features that are not found in any other library:

  • The Endpoint API that enhances face by automatically handling repetitive tasks such as Interest retransmissions and packet signing/verification, so that app developers can focus on the application logic.
  • An implementation of trust schemas.
  • NDN Certificate Management protocol implementation, including a graphical user interface for the certificate authority component.

I also threw in two web applications: