A year ago, a Kickstarter campaign CHIP - The World's First Nine Dollar Computer caught my attention: it's a $9 computer smaller than a banana. Unlike the Raspberry Pi, it comes with onboard storage so I don't need to buy a separate SD card, it has WiFi instead of wired Ethernet so I don't have to run wires everywhere, and it is compatible with my existing VGA monitor through a $10 adaptor so I don't have to buy another HDMI monitor. Therefore, I snagged two of these little computers along with one VGA adapter during the campaign.
During the whole year of waiting, Next Thing Co sent me regular email updates on the development progress, with each email ending with mmmtc (much much more to come) and a lot of hearts. NTC also clarified that C.H.I.P is strictly B.Y.O.B. Finally, my pair of CHIPs and a VGA DIP arrived in my mailbox on Jun 16. An hour later, yoursunny.com homepage is displayed on its Debian desktop.
A few more hours later, I start to discover a limitation of C.H.I.P software: The Linux kernel comes with CHIP operating system has very limited features.
$ sudo modprobe fuse
modprobe: FATAL: Module fuse not found.
Obviously, the solution to this problem is to compile my own Linux kernel with more features.
The compilation can be done on the C.H.I.P itself.
I managed to do that when the CHIP is powered by a 5V 1A phone charger plus a 1500mAh LiPo battery.
I had the compilation running under screen(1) and attended to it intermittently, and it finished in a day.
Changing Linux kernel is always a risky task, especially when you just compiled a new kernel that has never been tested. On a regular Ubuntu desktop, the GRUB bootloader allows you to select a kernel when system starts, so that you can go back to the old kernel if anything goes wrong. The equivalent to GRUB on C.H.I.P is U-Boot, which is text-based, and it's only accessible on UART. UART stands for "universal asynchronous receiver/transmitter", which is a hardware device that gives you access to a text-based console on the CHIP hardware. To access NTCCHIP's UART interface from a laptop, a USB/Serial converter is needed. But I don't have a USB/Serial UART converter. I also don't want to set my new kernel as the default without any testing, because if something goes wrong, I would have to reflash the entire disk image, and spend another day to compile everything all over again.
Is there a way to access UART of a C.H.I.P without using a USB/Serial converter? In other words, is there some other device that can access CHIP's UART? Looking around the house, and I realize that ESP8266 WiFi chip has an UART interface as well! Therefore, I could use the UART on one of these Witty Cloud boards to connect to the NTC CHIP's UART.
The ESP8266 Witty Cloud board comes with two PCBs: the top PCB has the ESP8266 microcontroller and an AMS1117 voltage regulator; the bottom PCB has an CH340G USB-Serial chip, and connects to the top PCB via two rows of headers. The easiest option seems to be detaching the top PCB, and connecting the CH340G to CHIP. However, I feel it's risky because I'm unsure whether the CH340G is working on 5V or 3.3V logic, given that there's neither a 3.3V voltage source on the bottom PCB nor a 3.3V pin on the headers. ESP8266 has a level shifter on the RX pin, so it can tolerate 5V; but the Allwinner R8 on C.H.I.P is strictly 3.3V logic level, and in case the CH340G transmits at 5V, my $9 computer would be damaged. Therefore, I decide to go with a safer way: connect the ESP8266 to NTC CHIP. Every output on the ESP8266 is at most 3.3V, so this should be totally safe.
A quick search finds WiFiTelnetToSerial.ino, an Arduino sketch example that implements a telnet server on the ESP8266 which copies bytes between TCP socket and the hardware serial interface. I burned this firmware into the ESP8266, and then detached the top PCB.
Then, I wired the ESP8266 Witty Cloud board top PCB to the C.H.I.P is follows:
| ESP-Witty | C.H.I.P |
|---|---|
| GND | GND |
| TXD | UART1-RX |
| RXD | UART2-TX |
| VCC | VCC-5V |

Since Witty Cloud board top PCB exposes male headers while C.H.I.P has female headers, I had to use a dupont wire plus a jumper wire for each connection, similar to what I did to connect Witty's two PCBs with six wires for flashing.
The connection between ESP-Witty's VCC and CHIP's VCC-5V is optional. This connection allows the ESP-Witty to be powered by CHIP's AXP209 5V output. However, it's important that no USB power is supplied to ESP-Witty's microUSB port, because the AXP209 won't be happy if there's input power on its output lines. With this wiring, both board should be powered from a battery or USB power on the CHIP. Alternatively, disconnect the VCC wire, and power each board separately.
If everything goes well, the ESP8266 should connect to the WiFi, and its IP address would show up on the WiFi access point. This is true even if C.H.I.P is not yet powered on, because the AXP209 supplies VCC-5V regardless of CHIP's power state. And I can telnet into ESP8266's IP address on port 23, then stare at a blank screen.
Now, press the power button on C.H.I.P for two seconds, and the C.H.I.P should power on normally. And messages start popping up on our telnet UART console:
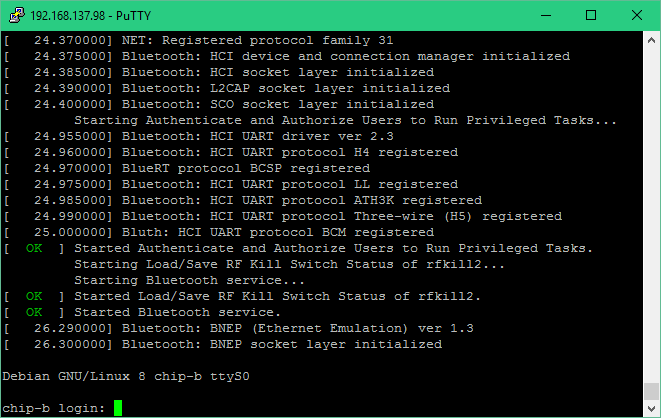
To access U-Boot, login to the system, execute sudo shutdown -r now, and then smash on that ENTER key like crazy to stop U-Boot's autoboot.

This solution isn't perfect: most of the commands I typed into telnet gets echoed back twice. Also, when the C.H.I.P outputs a long string, some bytes can get lost, making it difficult to find out the complete bootcmd (which can be found in boot-repair tool source code).
But this shall be sufficient for choosing a kernel, because all I need to do is to stop the autoboot, and paste in two commands to choose a kernel:
setenv bootcmd 'gpio set PB2; if test -n ${fel_booted} && test -n ${scriptaddr}; then echo (FEL); source ${scriptaddr}; fi; mtdparts; ubi part UBI; ubifsmount ubi0:rootfs; ubifsload $fdt_addr_r /boot/sun5i-r8-chip.dtb; ubifsload $kernel_addr_r /boot/vmlinuz-4.4.13-sunny+; setenv bootargs $bootargs $kernelarg_video; bootz $kernel_addr_r - $fdt_addr_r'
boot
Finally, I'm able to safely test my new kernel, wirelessly, without buying a USB/Serial converter.