NFD nightly APT repository

This article contains instructions of NFD nightly APT repository, which provides automated builds of NDN Forwarding Daemon (NFD) and related software.

This article was latest updated on 2021-10-30 to reflect latest changes.

Instructions

To install NDN software from NFD nightly APT repository:

  1. If you have previously installed NDN software from named-data PPA or source code, you need to delete them to avoid conflict. See switch between installation methods section below.

  2. Visit https://nfd-nightly.ndn.today webpage, choose your operating system and CPU architecture, and you'll get a setup command.

    Run this setup command in the terminal, which adds NFD-nightly as a package source.

  3. Update package lists:

    sudo apt update
  4. Install desired packages, such as:

    sudo apt install nfd ndnping ndnpeek infoedit

    You can see available packages on https://nfd-nightly.ndn.today webpage.
NFD nightly went APT

NOTICE Instructions in this article are outdated. Please see latest information in NFD nightly usage.

Last year, I started building NFD nightly packages in GitHub Actions. So far, installation is a manual procedure: the user must manually download the ZIP files from nfd-nightly.ndn.today, decompress them, and figure out the dependency among various .deb packages. Starting today, I'm publishing NFD nightly packages in an APT repository, and you can install them with apt-get command.

Add the NFD nightly APT repository

Add the repository with the command that matches your platform:

# Ubuntu 18.04 (bionic), amd64 (laptops and servers)
echo "deb [trusted=yes] https://nfd-nightly-apt.ndn.today/ubuntu bionic main" \
  | sudo tee /etc/apt/sources.list.d/nfd-nightly.list

# Ubuntu 20.04 (focal), amd64 (laptops and servers)
echo "deb [trusted=yes] https://nfd-nightly-apt.ndn.today/ubuntu focal main" \
  | sudo tee /etc/apt/sources.list.d/nfd-nightly.list

# Debian 10 (buster), amd64 (laptops and servers)
echo "deb [trusted=yes] https://nfd-nightly-apt.ndn.today/debian buster main" \
  | sudo tee /etc/apt/sources.list.d/nfd-nightly.list

# Debian 10 (buster), armv7 (Raspberry Pi 3 or 4)
echo "deb [trusted=yes] https://nfd-nightly-apt.ndn.today/debian buster main" \
  | sudo tee /etc/apt/sources.list.d/nfd-nightly.list

# Debian 10 (buster), armv6 (Raspberry Pi Zero W)
echo "deb [trusted=yes] https://nfd-nightly-apt.ndn.today/raspberrypi buster main" \
  | sudo tee /etc/apt/sources.list.d/nfd-nightly.list

Enable IPv4 Access in EUserv IPv6-only VS2-free

EUserv is a virtual private server (VPS) provider in Germany. Notably, they offer a container-based Linux server, VS2-free, free of charge. VS2-free comes with one 1GHz CPU core, 1GB memory, and 10GB storage. Although I already have more than enough servers to play with, who doesn't like some more computing resources for free?

There's one catch: the VS2-free is IPv6-only. It neither has a public IPv4 address, nor offers NAT-based IPv4 access. All you can have is a single /128 IPv6 address.

$ ip addr
1: lo: <LOOPBACK,UP,LOWER_UP> mtu 65536 qdisc noqueue state UNKNOWN group default qlen 1000
    link/loopback 00:00:00:00:00:00 brd 00:00:00:00:00:00
    inet 127.0.0.1/8 scope host lo
       valid_lft forever preferred_lft forever
    inet6 ::1/128 scope host
       valid_lft forever preferred_lft forever
546: eth0@if547: <BROADCAST,MULTICAST,UP,LOWER_UP> mtu 1500 qdisc noqueue state UP group default qlen 1000
    link/ether b2:77:4b:c0:eb:0b brd ff:ff:ff:ff:ff:ff link-netnsid 0
    inet6 2001:db8:6:1::6dae/128 scope global
       valid_lft forever preferred_lft forever
    inet6 fe80::5ed4:d66f:bd01:6936/64 scope link
       valid_lft forever preferred_lft forever

If I attempt to access an IPv4-only destination, a "Network is unreachable" error appears:

$ host lgger.nexusbytes.com
lgger.nexusbytes.com has address 46.4.199.225
$ ping -n -c 4 lgger.nexusbytes.com
connect: Network is unreachable

How to Select Default IPv6 Source Address for Outbound Traffic in OpenVZ 7

I bought a few Virtual Private Servers (VPS) on Black Friday, and have been busy setting them up. Nowadays, most VPS comes with an IPv6 subnet that contains millions of possible addresses. Initially, only one IPv6 address is assigned to the server, but the user can assign additional addresses as desired. Given that I plan to run multiple services within a server, I added a few more IPv6 addresses so that each service can have a unique IPv6 address.

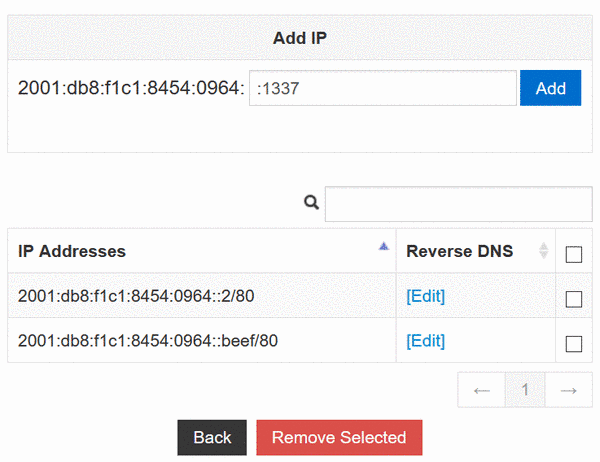
One of my servers is using OpenVZ 7 virtualization technology, in which I installed Debian 10 operating system. Commonly, OpenVZ 7 uses virtual network device (venet) that does not have a MAC address. venet devices are not fully IPv6 compliant, but still works if you statically assign IPv6 addresses. Moreover, every IP address used in a container must be configured from the host node, because venet would drop ip-packets from the container with a source address, and in the container with the destination address, which is not corresponding to an ip-address of the container. Therefore, I must use the VPS control panel, in this case SolusVM, to assign IPv6 addresses to my server:

IPv6 Subnet management in SolusVM

In the Add IP section, the IPv6 subnet prefix 2001:db8:f1c1:8454:0964: is already shown. Notice that I am putting a colon (:) in front of the suffix 1337, so that they concatenate to the full address 2001:db8:f1c1:8454:0964::1337. Forgetting this colon would cause "Invalid Entry" error.

After making this change in the SolusVM control panel, the /etc/network/interface file on my server is updated automatically:

Install Debian 10 on Netgate SG-2220 via Serial Port with iSCSI Disk

I get my hands on a Netgate SG-2220 network computer. It comes preinstalled with either pfSense firewall software, or CentOS in the case of DPDK-in-a-box edition. However, I'm more familiar with Debian based operating systems. Can I install Debian on the Netgate SG-2220?

The Console Port

Hardware specification of the Netgate SG-2220 includes:

  • Intel Atom C2338 processor, dual core at 1.7 GHz
  • 2GB RAM
  • 4GB eMMC storage
  • one USB 2.0 port
  • two 1 Gbps Ethernet adapters

Notably missing is a VGA or HDMI port to connect to a monitor. Instead, this computer offers a mini-USB "console port". It is a UART serial port with a USB-UART bridge chip already included, unlike the C.H.I.P $9 computer that only provides serial over pin headers.

NFD nightly packages

NOTICE Instructions in this article are outdated. Please see latest information in NFD nightly usage.

NDN Forwarding Daemon (NFD) is the reference implementation of Named Data Networking (NDN) forwarding plane. The software is continuously developed, but binary releases happen rather infrequently. Recently, I made a workflow to build NFD and related software automatically.

Download page: nfd-nightly.ndn.today

Instructions

Which platform should I choose?

Access C.H.I.P UART Wirelessly with ESP8266

A year ago, a Kickstarter campaign CHIP - The World's First Nine Dollar Computer caught my attention: it's a $9 computer smaller than a banana. Unlike the Raspberry Pi, it comes with onboard storage so I don't need to buy a separate SD card, it has WiFi instead of wired Ethernet so I don't have to run wires everywhere, and it is compatible with my existing VGA monitor through a $10 adaptor so I don't have to buy another HDMI monitor. Therefore, I snagged two of these little computers along with one VGA adapter during the campaign.

During the whole year of waiting, Next Thing Co sent me regular email updates on the development progress, with each email ending with mmmtc (much much more to come) and a lot of hearts. NTC also clarified that C.H.I.P is strictly B.Y.O.B. Finally, my pair of CHIPs and a VGA DIP arrived in my mailbox on Jun 16. An hour later, yoursunny.com homepage is displayed on its Debian desktop.

A few more hours later, I start to discover a limitation of C.H.I.P software: The Linux kernel comes with CHIP operating system has very limited features.

$ sudo modprobe fuse
modprobe: FATAL: Module fuse not found.

Obviously, the solution to this problem is to compile my own Linux kernel with more features. The compilation can be done on the C.H.I.P itself. I managed to do that when the CHIP is powered by a 5V 1A phone charger plus a 1500mAh LiPo battery. I had the compilation running under screen(1) and attended to it intermittently, and it finished in a day.